membrane switch, membrane switch assembly
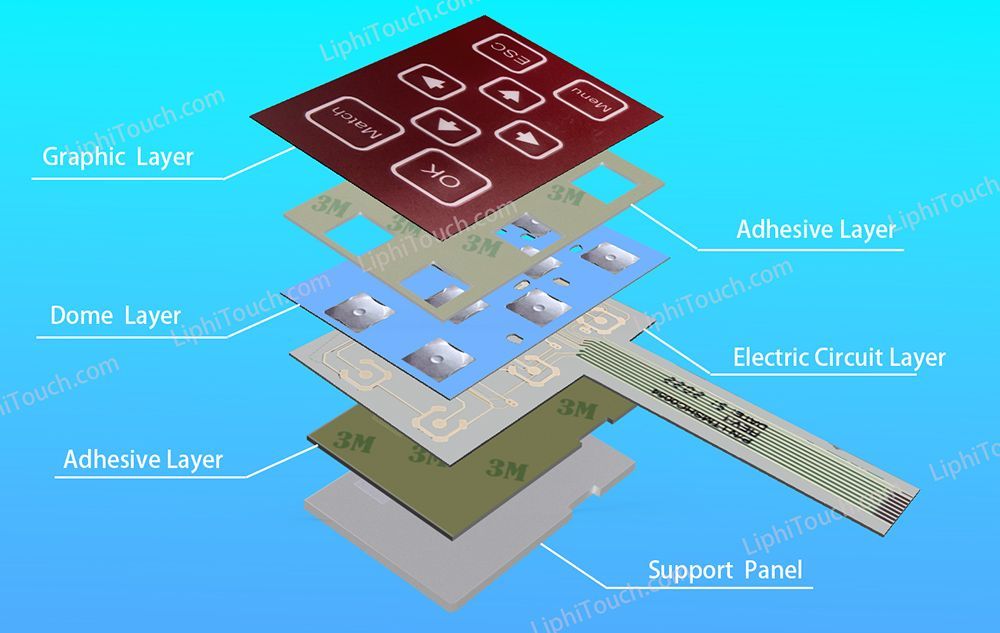
Membrane Switch Lamination Structure
A membrane switch is a kind of portable control switch, on which overlay, there some of beautiful buttons printed icons, letter, numbers etc. Its buttons look a little bulging, pressing them and have a tactile feeling. This makes ender user use it easily . Therefore, these membrane switches being combined with numerous separate layers and components. Circuit layers and insulation layers builds the final membrane switch. The following chart is just for membrane switch lamination assembly.
Let’s begin briefly by introducing membrane switches, their anatomy, each layer has its own special purpose, how many layers a membrane switch has will be decided by its functions and applications end user want to. At least three layer is basic, maybe sometimes they need to have five, six layer available.
For this reason, it’s so strict for product designers and manufacturers. Thoroughly understand the many parts that go into creating a membrane switch lamination assembly. This will allow them to work with engineers to decide the optimum component combination for the desired outcome. The various parts of a membrane switch assembly are shown below.
1. Graphic Overlay
This is the top layer of a membrane switch and is crucial to the finished product because it acts as the control panel’s visual representation. The graphic overlay is the portion of the membrane switch that the user sees. Therefore, how it looks and feels can significantly affect how appealing a product is to the eye.
Because it offers higher chemical resistance and typically has a longer flex life than materials like polycarbonate, polyester is frequently chosen as the preferred material for graphic overlay. You can print any color, color scheme, or graphic on the graphic overlay.
Along with performance, durability is a factor in selecting the best graphic overlay. For instance, when paired with other layers, such as stainless steel domes, the proper thickness is required to achieve the desired level of tactile input. Additionally, you should choose materials and a consistency that will maintain a consistent level of tactile feedback throughout repeated switch cycles.
2. Overlay Adhensive layer
This layer holds the graphic overlay to the top circuit layer of a membrane switch assembly and is often an acrylic adhesive. An overlay adhesive’s durability is crucial, because it prevents the graphic overlay from detaching from the circuit layer beneath over time.
3. Metal Dome Layer
Tactile Buckling Elestic Pressing keys,when pressing a key down or releasing it, connect/disconnect to below layer’s electric circuit. Trigger a signal simultaneously, then produce a pulse to execute an order for machine action and control the machine or device work. Dome material is selected of stainless steel or better elestic material so that have a fast responsive time.
For the creation of tactile feedback, domes are necessary. Usually, stainless steel or polyester is used to make these. Due to its reduced cost and the satisfying tactile experience stainless steel domes provide, stainless steel is frequently chosen as the material of choice.
4. Circuit Layer
In reality, the circuit layer is made up of multiple different parts. The specific design of this layer varies in line with the various kinds of membrane switch assemblies. Other design factors and adjustments are also used in this layer to get the desired outcome. The circuit layer could contain:
the dome retainer (for tactile feedback).
electronic inks
A circuit spacer in a circuit (separating the top and bottom circuit layers)
5. Rear Adhesive Layer
On rare occasions, this layer is viewed as a part of the circuit layer. But given the significant role it plays and the crucial aspects to take into account when selecting the finest adhesive for your product’s requirements. It deserves to be discussed separately. The rear adhesive layer, which holds the membrane switch assembly to the product or hard backing. It must be durable enough to stand the test of time.
A 3M 467MP pressure-sensitive adhesive is frequently utilized for the rear adhesive layer. A 3M 468MP pressure-sensitive adhesive may be used for more excellent adhesion and durability. But also the membrane switch assembly must occasionally cling to a rough surface. A modified acrylic adhesive, such as 3M9471LE or 3M9472LE, is advised when the membrane switch must stick to a low surface energy material. As powder-coated paint or polypropylene. Bond strength is also influenced by how it is used. Thus, best practices should be followed for the best outcomes.
6. Back Panel Layer
Although an optional part, this complex support layer is frequently utilized to give a membrane switch assembly more structural support. Depending on the needs of the product, the back panel is commonly made of aluminum, which can be left naked, dined, painted, or anodized.
The rear panel can also be produced with studs, holes, or stand-offs to fit the application. A membrane switch panel is a name for the assembly created when a back panel and a membrane switch assembly are united. While numerous businesses produce membrane switches and individual parts, very few companies specialize in designing and producing whole membrane switch panels.
Separation lamination layers are united in order
Understanding the various parts that go into making a membrane switch assembly is helpful.But working with a professional design and engineering team with experience coming up with ideal membrane switch lamination assembly solutions. For various applications ensures that the finished product is well-suited for the functionality and requirements of your product. The optimum parts and combinations to provide the authentic look and feel of experienced membrane switch design. Engineers can recommend the experience you’re looking for your finished product. You can discuss product specs with the design team more effectively if you are familiar with the various parts and materials and their functions.
As customers approach us in search of a helpful user interface for a product or piece of machinery. With a specially made membrane switch created by LuphiTouch, this assembly can be accomplished in the best possible method.
LuphiTech’s Advantage of Assembly
We have worked with thousands of clients across all industries over 15 years in business to build the best custom membrane switches. We have discovered that one of Luphi’s most valuable assets is delivering suggestions, providing education. And having in-depth discussions on what is required because most of our clients have little expertise in membrane switch lamination assembly.
When affixed to metal support plates with considerable dimensions, even the best-designed and -produced flexible screen-printed membrane keypads may encounter issues.
The sandwiched plastic/adhesive membrane keypad and the metal support plate have different thermal coefficients of expansion, which is the cause of the problem. The contact between the membrane keypad’s acrylic back mounting adhesive and the metal plate experiences shear stress. Maybe because of higher or lower temperature excursions from room temperature due to the difference in expansion rates. The performance of acrylic adhesive in terms of peel strength is superior to sheer strength. Delamination between the membrane keypad and the metal support plate may result from repeated stress cycles. There is no real fix or repair once the delamination begins.
As one of professional Membrane switches Manufacturer, we take good consideration for detail issues when customer need good quality membrane switch . So we can serve you with our care ! it provides customer membrane switch lamination assembly !